Advertisement
Article Posted by: Mark Alonzo
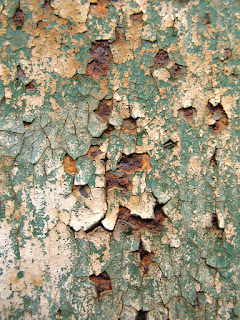
In this article we will discuss how to put image on your text. Reflecting the design of image merge with the text. I have used materials a like grunge metal it will result like this. And match with background to look more old and grungey texture
CLICK THE VIDEO TO PLAY
Materials use this and download it: Grunge Metalic Texture( To download full size of this image just click it )

Step 1:
Go to File > Open. Now locate the materials or image you want to use. Then load it to photoshop.
Step 2:
Now go to Image > Rotate Canvas > 90 degree CW to change the position of the image because later we will put the text according to the position of this image and merge with text.
Step 3:
Now after rotating the this grunge image select Text on the Tool Box then select font style that you want to use then change the size of your font see this encicled image and pointing arrow below. Now type the word that you want. Here i have written CRUNK.
Step 4:
After writing your own text press CTRL + T. Be sure your holding the CTRL this will appear a box to your text. This means your able to resize this text larger than this.See this image below.
Continue Here: After resizing it will result like this. Resize yours fitted to image your using. Until box is still appearing you can resize to whatever size you want.
Step 5:
After resizing. Press Enter to disappear the box. Now in your Layer Box hold CTRL + left click to a Text Layer named CRUNK. Afterwards a running selection to a text will appear. See this image below
Step 6:
Now click the Layer Background be sure it is highlighted now press CTRL + C means we will copy this entire image around selection we made in Layer Text named CRUNK.
Step 7:
Now on your keyboard press CTRL + V means we will paste the copied layer on background creating new layer.In this image below new Layer has been created namely Layer 1. This will appear after pressing CTRL + V from CTRL + C a while ago. We copied the entire image in background to reflect the image to that CRUNK text.
Step 8:
On your Layer Box. Have you seen the 3 Eyes?That means visibility of that layer for a user to be seen. Now turn off that Eye in CRUNK Layer and also Background Layer. For us to see the result of Step 7 after we copied the entire image.Here is the result reflecting the image to your text CRUNK.
Step 9:
In this step we will make a background that fits to that New Text Image. So that it will not look sticky and has more texture to blend. Now on your Layer Box. Click the Color Palette. Choose color value that you want. Heres mine # 410606.
Step 10:
Now im creating new Layer namely Layer 2. So that we can fill a color background on this text image. For creating new Layer see this image below.
Step 11:
Now selecting the color in Step 9 click here to fill the color. Use Paint Bucket Tool.Look this encircled image below.
Step12: (optional)
In this last step of mine. It rather you want to have this step or not. I made this last step to add more uniqueness and look more grungey ones. I click CROP TOOL to cut the extra space in new background color red + brown and to look more smaller fitted to a text name CRUNK. Now its done.
You can change your background to add more style and uniqueness like this.
More text style just click this blue link below.
Advertisement


1 comment:
i like your concept with texture so easy to follow thanks for the tips.
Post a Comment