
Advertisement
Article Posted by: Mark Alonzo
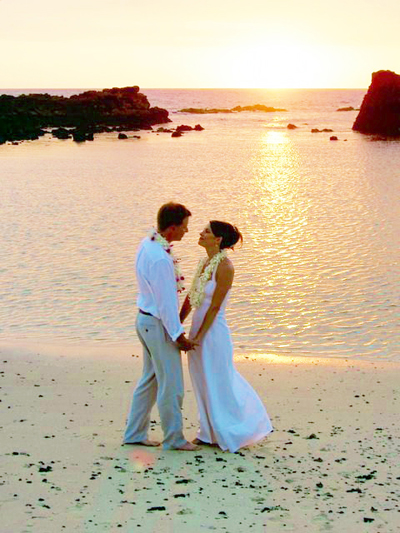
In this article im looking for a couple who were in the beach. I added some stuff to look more romantic with their shot. Looking this photo dont have any material or any objects to add with. Its all done with Filter Options, Image Adjustment and Feather Effects
CLICK THE VIDEO TO PLAY

Download this Photo ( Sample Photo Here)
Following this direction open your photoshop go to File > Open then select the couple picture you have downloaded or any picture that you want to use with this Feather Effects.

Step 2:
Now on your Layer Box click Create New Layer. After clicking, a name Layer 1 will appear above the Background. We will use that Layer later to fill with color black. Just follow the arrow see this image below.

Step 3:
On your Tool Box click Color Palette to choose color. Here i used color black as sample with this tutorial. After selecting the desired color you want click Ok.

Step 4:
Now select Pain Bucket Tool to fill the Layer 1 we made a while ago. Just click on the ground of that couples. After clicking a color black will appear.

Step 5:
Now on your Tool Box switch another tool. Select Marquee Tool not rectangular but circular. To change Circular just right click the Marquee Tool Follow this image below. We will use this tool to encircle the couple adding feather at the next step to see the effect.

Continue Here:
After making circular selection. Right click that circle then select Feather. Set to 100 then click Ok. Now in your keyboard find the word Delete then press that Delete. See step 6 for the result of pressing Delete.

Here Continue ( Setting Feather to 100 reffered Step 5 above this)

Step 6:
After pressing Delete here how it looks. The couples are there not hiding from the black color anymore and has Feather effect already. Now to remove the Circular selection press CTRL + D.

Step 7:
In this step we will change the adjustment of the couples turning more romantic color reflecting with the beach and sun near them. On your Layer Box click the name Background. Go to Image >Adjustment > Color Balance. Experiment and adjust the desired value you want. In my sample i adjusted it all but more on Red and Magenta and bit Yellow.

Step 8 (optional)
In my sample i added lighting effect reflecting the sun to them. Its either you will add this step or not. On your Layer Box just click the name Layer 1 then go to Filter > Render > Len Flare select Lens type to 50 - 300mm Zoom. See this image below.

Finish Product Here: After adding Lens Flare in Filter Options. The light from the sun position reflecting to them.

Another sample Romantic Photo Effect just click this blue link below.
Advertisement
3 comments:
cool.... tnx for the tips...
charrzzz...
go go go marky!
Kaslon nmn daw ka tin? ari lng pakasal.hehe free pa layout.
Post a Comment