Advertisement
Article Posted by: Mark Alonzo
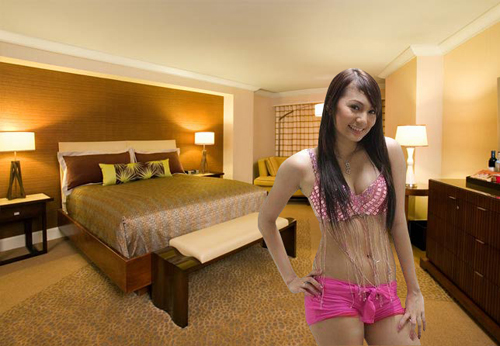
I downloaded 2 pictures as an example.One is for the place that will be used in transfering the other picture name Aiko or the person to be put there.Later you will see how i will going to put Aiko inside the room.See this picture below.
CLICK THE VIDEO TO PLAY
Before
After
Step 1:
On your photoshop click File > Open then locate the picture you want to change new background. Load the picture first that you are going to transfer to a certain place. Just follow this.
Step 2:
When the picture has been loaded go to your Tool Box select Pen Tool then select Paths located under your menu bar. We will use this tool so that we can cut the figure of her body. Make a point around her body.See the encircled image here
Continue Here: Making Points around her body. Just click left mouse only from a buttom to a top then until you encircled around her body.
Step 3: From the last point you have made enclose the 1st point. So that we can make a cut here.
Step 4: After closing the points Right Click then select Make Selection. There will appear a selection running whole of your body that means it is ready for cutting.
Continue Here: Feather set to 0 only. Because Later we will apply feather through Inverse way. Just set 0 only from this moment.
Step 5:
This is a running selection i told u in the previous step. This means ready for cutting selection. So what you gonna do next press CTRL + X on your keyboard. The image will cut after pressing that command.
Step 6:
The image has been cutted already after CTRL + X see this image below. We will now load the 2nd Picture which is the room. We will put Aiko inside the room so after cutting out go to File > Open find the place where you want to put this image. It depends on you what place that suits.
Step 7:
The picture room is already been loaded. Now press CTRL + V to paste the cutted picture here. Now we cant escape from the mess thing we have done from cutting because there are some instances that we cant observe while cutting. Now on your Tool Box select Eraser for us to remove the mess part of this picture which is the white area underneath of her arm and others.
Step 8:
After erasing the white portion underneath her both arms press CTRL + T from free transform. We can adjust the size of this image or move to what side you want to place this picture. Either on the Left or Right side. So i prefer to place this image in the right side. Hiding her legs because it is not whole leg so its very awkward to see this picture having no legs. So move to a right side then after moving hit ENTER on your keyboard. Then Save it go to File > Save then Quality = 12 then click Ok.
Finish Product:
This step has done with the Pen Tool and Eraser only. And a few adjustment. This is the Finish Product. Thanks for watching and dont forget to leave comment.

More samples here.Try this for you click this blue link below
Advertisement


No comments:
Post a Comment