
Advertisement
CLICK THE VIDEO TO PLAY


Article Posted by: Mark Alonzo
We have here example of photo having color in eye and one is not. Putting Color into an eye makes more attractive.
Some people wearing contact leans so that they look more beautiful to those people want to see them and captured there attentions. In this article we will discuss the step on how to put color into eye that suits your best follow this guide carefully.
STEP 1:
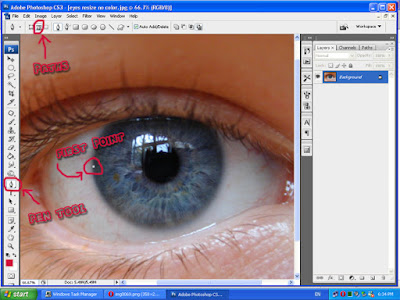
Load your photo from the File menu just click it. Drop down list will apper select Open and then locate your photo to where it saved then click Open button to appear your photos in photoshop.Within the tool select Pen Tool then be sure it sets already Paths in the menu bar before pointing it to the image. After adjusting what kind of Pen Tool you will be used so you can start a first point with your first click. Follow this sample image where i encircled the First Point.
Continue Here:
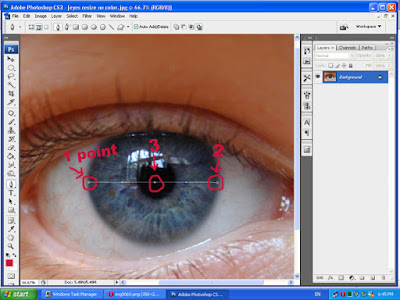
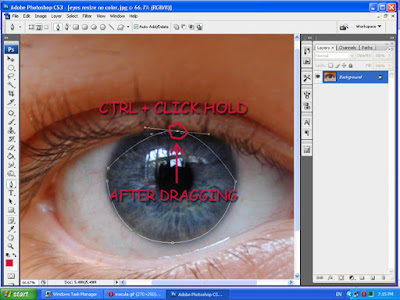
Continue doing 1-3 points from left to right then middle area of an eye. Observe how i did putting points with this image using Path Tool. After having 3 points. Next thing you do hold CTRL on your keyboard + Left Click the 3rd point. Drag below the edge of your IRIS. Follow the next step of this image.
Step 2:
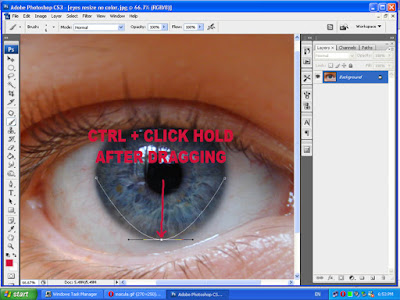
Here Sample: "Hold CTRL + Left Click then drag the 3rd points below the edge your IRIS". It will result like this. Next thing you do follow next sample image below.
Step 3:
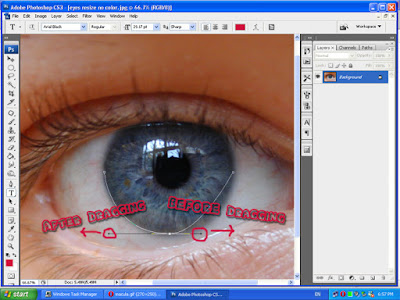
So after dragging the 3rd point below the edge of your IRIS. Remember we have putted the 1 point and the 2nd point in the previews image Now hold CTRL + Left Click the point i encircled drag to a Left Direction consuming the are of your IRIS. Also with the another point i encircled in the right ared same process for dragging dnt forget hold CTRL + Left Click of your mouse. I have made also captions and label with this image for you to follow your work wether its right or wrong. Observe how i did it.
Step 4:
After dragging the point to a left and right direction. Now we will make a 4th point overwriting the 3rd Point follow this image below. After putting the 4th point. We will make 5th point also then 6th point in the middle of your eye.Same with the previous step. Follow this image below.
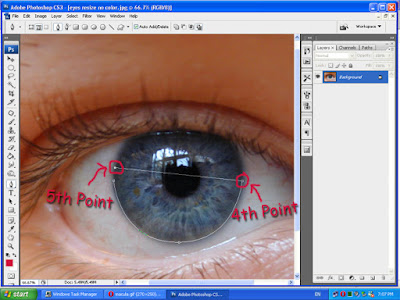
Continue: Here how it looks having 4th point to 5th point also 6th point. Same process with Step 2 drag the middle point but now we will drag this 6th point above the edge of your IRIS but is not below. When dragging dont forget this always " hold CTRL + Left Click ".

Step 5:
After dragging 6th point here how it looks like. Position it above the edge of your IRIS. Consuming the size to be filled with color later on.
Step 6:
Now in this step it is same with Step 3 on how to drag the point in left and right direction. Look at those encircled area of this point see first on left how it is being drag. Den followed by another side in right direction. Again when dragging dont forget this " hold CTRL + Left Click". If you forget this guide refer to Step 3 but here where enclosing another half of your eye. See this image below.

Step 7:
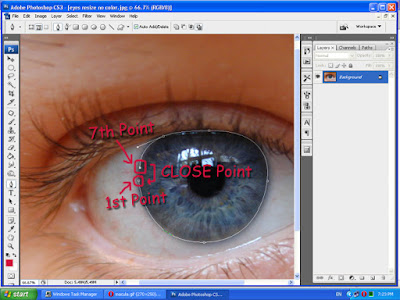
In this step after dragging the left point and the right point consuming the other half of your eye in the upper part. So this make us a whole adding the lower half of your eye. When closing the 7th Point to a 1st point in the upper left part see this image below.
Step 8:
So reffered the picture above your closing the 7th point to 1st point. After closing your Right click on image then select Make Selection. See the image below

Continue Here:
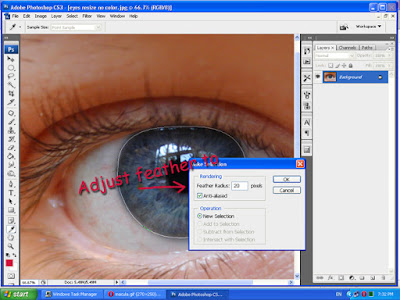
After clicking the Make Selection you must set the Feather Radius to 20 then be sure Anti-aliased has been check already then click Ok. What is feather? Feather is how you adjust the smoothness of every edge of an object so that it will not look sharp.As an instance it will look more reality and more smooth at the edge. So here we have setted feather to 20. The higher the value you have seated the higher the smoothness it result. Better to zoom the image so that you can see the difference of it having feather or not.
Step 9:
After clicking the Ok button. Go to Image > Adjustment > Color Balance or CTRL + B for a shorcut. See the image below.
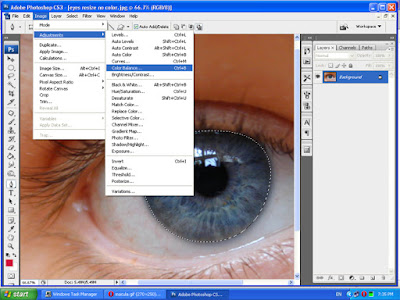
Step 10:
A box appeared name Color Balance. As you can see there we have Cyan, Magenta, Yellow, Red, Green, Blue. For me i've setted Green to +16 then Blue to + 34 to look more blend than the color of Green + Blue. See the image result below after i blend the 2 colors. It depends on you how you will set or blend the value of colors. Then click Ok.

After clicking Ok. So now this is the result after blending the value colors of Green + Blue See the image below. Then hold CTRL + D to deselect the rounded selection. Thanks and dont forget to leave comment after reading this article.
Here Finish Product:

STEP 1:
Load your photo from the File menu just click it. Drop down list will apper select Open and then locate your photo to where it saved then click Open button to appear your photos in photoshop.Within the tool select Pen Tool then be sure it sets already Paths in the menu bar before pointing it to the image. After adjusting what kind of Pen Tool you will be used so you can start a first point with your first click. Follow this sample image where i encircled the First Point.
Continue Here:
Continue doing 1-3 points from left to right then middle area of an eye. Observe how i did putting points with this image using Path Tool. After having 3 points. Next thing you do hold CTRL on your keyboard + Left Click the 3rd point. Drag below the edge of your IRIS. Follow the next step of this image.
Step 2:
Here Sample: "Hold CTRL + Left Click then drag the 3rd points below the edge your IRIS". It will result like this. Next thing you do follow next sample image below.
Step 3:
So after dragging the 3rd point below the edge of your IRIS. Remember we have putted the 1 point and the 2nd point in the previews image Now hold CTRL + Left Click the point i encircled drag to a Left Direction consuming the are of your IRIS. Also with the another point i encircled in the right ared same process for dragging dnt forget hold CTRL + Left Click of your mouse. I have made also captions and label with this image for you to follow your work wether its right or wrong. Observe how i did it.

Step 4:
After dragging the point to a left and right direction. Now we will make a 4th point overwriting the 3rd Point follow this image below. After putting the 4th point. We will make 5th point also then 6th point in the middle of your eye.Same with the previous step. Follow this image below.
Continue: Here how it looks having 4th point to 5th point also 6th point. Same process with Step 2 drag the middle point but now we will drag this 6th point above the edge of your IRIS but is not below. When dragging dont forget this always " hold CTRL + Left Click ".

Step 5:
After dragging 6th point here how it looks like. Position it above the edge of your IRIS. Consuming the size to be filled with color later on.
Step 6:
Now in this step it is same with Step 3 on how to drag the point in left and right direction. Look at those encircled area of this point see first on left how it is being drag. Den followed by another side in right direction. Again when dragging dont forget this " hold CTRL + Left Click". If you forget this guide refer to Step 3 but here where enclosing another half of your eye. See this image below.

Step 7:
In this step after dragging the left point and the right point consuming the other half of your eye in the upper part. So this make us a whole adding the lower half of your eye. When closing the 7th Point to a 1st point in the upper left part see this image below.

Step 8:
So reffered the picture above your closing the 7th point to 1st point. After closing your Right click on image then select Make Selection. See the image below

After clicking the Make Selection you must set the Feather Radius to 20 then be sure Anti-aliased has been check already then click Ok. What is feather? Feather is how you adjust the smoothness of every edge of an object so that it will not look sharp.As an instance it will look more reality and more smooth at the edge. So here we have setted feather to 20. The higher the value you have seated the higher the smoothness it result. Better to zoom the image so that you can see the difference of it having feather or not.
Step 9:
After clicking the Ok button. Go to Image > Adjustment > Color Balance or CTRL + B for a shorcut. See the image below.
Step 10:
A box appeared name Color Balance. As you can see there we have Cyan, Magenta, Yellow, Red, Green, Blue. For me i've setted Green to +16 then Blue to + 34 to look more blend than the color of Green + Blue. See the image result below after i blend the 2 colors. It depends on you how you will set or blend the value of colors. Then click Ok.

After clicking Ok. So now this is the result after blending the value colors of Green + Blue See the image below. Then hold CTRL + D to deselect the rounded selection. Thanks and dont forget to leave comment after reading this article.
Here Finish Product:
Advertisement
No comments:
Post a Comment