
Advertisement
Article Posted by: Mark Alonzo
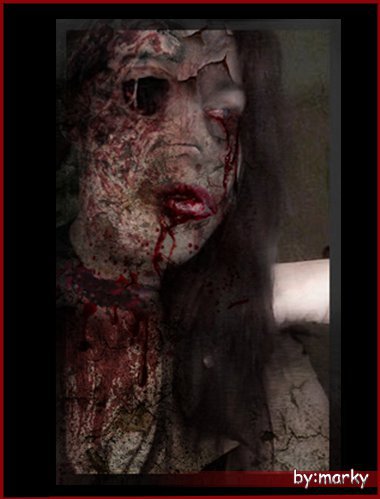
Im deciding to create for a new post a girl with scary look effects using photoshop again. While im surfing on net i found a girl to use as an example thought i can play and deform on her face. A moment after my expirement a result like this. Look and follow the step below.
CLICK THE VIDEO TO PLAY
Before ( First Coating ) I've only used first photo the sided view.

Materials and Resources before i add up with her face. Im searching for a keyword (spider veins, wounded skin, scars, vampire bite, war victim or massacre, splatter blood, crack texture or grunge texture) or anything resources just to look more scary when you try to add up this thing all and having a little experiment merging and blending all of this. Here im having my own resources just or you can download with your own.
Download this and to view the full size of this image just click and save it.


Follow this step carefully
Step 1:
Open your photoshop now go to File > Open locate the picture where you've saved. Then click Open button. When the picture is been loaded there at photosop prepare the materials and resources that you have downloaded. Assume you have already gathered them all. Here i already used the 1st photo shot.

Step 2:
Go to Image > Adjustment > Hue and Saturation. We're going to adjust the saturation of her skin to look more dry and dead. Now adjust the value of Saturation to 46 or anything you want just to look more dead. Then click Ok.

Step 3:
I open the the first material / resources namely skull. I select only the left eye hole then cut it down using Marquee tool transferred to a lady. Just make a square selection then after press CTRL + X to cut the entire selection. See this image below

Step 4:
Back to a lady press CTRL + V pasting the cutted eye hole to her face. Resizing the image when its to large or small just press CTRL + T to have a Free Transform of that image just drag and hit Enter after resizing the desired size fitting to her left eye. Here after resizing using CTRL + T.

Step 5:
Now on your Tool Box select Brush then select color Black on your Color Palette brush that left eye to black. To look her eye has a hole removing the eye ball.

Step 6:
After brushing go to Image > Adjustment > Curves. Adjust the curve value dragging the diagonal line at the buttom the lightness represented as slant graph the more you adjust at the top the more the lightness increase otherwise turn darker.

Step 7:
On your Tool Box select Eraser change its type to Soft Round below the menu bar. Follow the encircled image below. Adjust the opacity to 50 % not harder to erase but its soft to look when it erase. Here i encircled the Soft Round 21.


Step 8:
I open the second material / resources the crack texture. On your Tool Box i used again Marquee Tool making a square selection then press CTRL + X to cut that selection transferred to a lady on a next step. Follow this image below.

Step 9:
Back to a lady press CTRL + V pasting to her face. Again when resizing press CTRL + T then drag to a desired size you want then press Enter. Here in my layer i change the blend mode from Normal to Multiply so that the texture will merge the skin of that lady.

Step 10:
Same process with Step 7. On your Tool Box select Eraser change its type to Soft Round below the menu bar. Follow the encircled image below. Adjust the opacity to 50 % not harder to erase but its soft to look when it erase. Just erase the square edge. ( When it set already the kind of eraser and its opacity you dont need to adjust back again. ) Here im just having a review how you will set the eraser.

Step 11:
Go to Image > Adjustment > Color Balance. Adjust the value of Cyan = ( -10 ) and Magenta = ( - 33 ) so that it turns more real merging this texture. Then press Ok after.

Step 12:
After adjusting the Color Balance i press CTRL + J to duplicate this crack texture then i move the duplicate crack image filling the entire skin of this lady so that crack skin look balance with this texture. For moving the duplicate image just use Move Tool or CTRL + T then drag where you will put on her skin. In this step i already add up splatter blood to her Lips another material. Using blending Layer Experiment on the Layer Box.


Step 13:
I open another material / resources namely Scar. Same process make a square selection using Marquee Tool cut the square selection using the command CTRL + X transferred to a lady.

Step 14:
Back to a lady press CTRL + V pasting the cutted scars here. Again for resizing the image when its too large or small just press CTRL + T then drag which the desired size you want then press Enter. Here in my sample i move the scars to her neck after resizing then i blend the Layer from Normal to Overlay to look more real scar merging with her neck.

Step 15:
I open another material / resources namely Wounded skin. I putted this to her left check. Same Process make a square selection using Marquee Tool then cut it down press CTRL + X transferred to a lady then press CTRL + V pasting to her. Then after resizing erase the square edge then blend the Layer.

For more Scary and another way of putting effects just click this blue link below.
Advertisement
1 comment:
mo comment daw.. dia ra.. hahaha XD
Post a Comment