
Advertisement
Article posted by: Mark Alonzo
Having a surf moment on net i was collecting top and gorgeous women in our country i downloaded 8 candidates of Binibining Pilipinas 2011 with their single whole glossy shots. With their post i crop their image turns to (1 x 1 photo) and also and more sizes you will learn
CLICK THE VIDEO TO PLAY
with this article. Follow this step how i did cropping this image turns to what size depends on you.

( 1 x 1 sample photos with 5 copies)

( 2 x 2 sample photos with 3 copies )

Follow this step carefully
Step 1:
In your photoshop located under you menu bar click File > New. We will make a new Canvas size. My canvas is equivalent to short bond page ( width = 8.5 height = 11 inches ) See this image below.

Continue Here: ( New Canvas Size )

Step 2:
In your new Canvas. Press CTRL + R to appear the Ruler guide. So that we can make adjustment with the size through inches before putting 1 picture here. Just drag the vertical the horizontal guide meeting the measurement of 1 inch.

Step 3:
After meeting the measurement of 1 inch i have added 4 same 1 inches to make it 5 container for pictures. Just drag the ruler guide horizontal and vertical line so that you divide it. With this, i can put 5 copies of 1 x 1 photos here.

Step 4:
Now 5 container for 5 copies of 1 x 1 photos are already prepared then i've loaded the 1st picture to be putted there. I use Move Tool for transfering picture. See the encircled image below.

Step 5: After moving. Press CTRL + T to resize the picture then hit Enter.

Step 6:
But then after resizing, I already select from head to shoulder only not the entire body of this women. I use Marquee Tool. Square selection as default. From the top click then drag it to a shoulder so we can make a square selection. After making a square selection then Right Click then Select Inverse and lastly press Delete on your keyboard. So we can now remain the cutted area to her shoulder only.

Step 7:
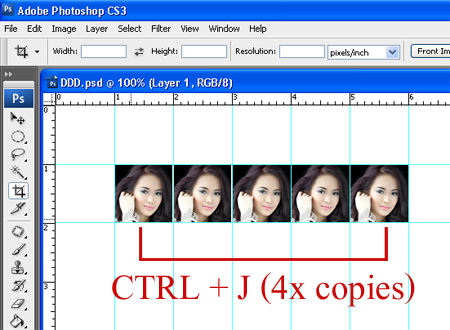
Now i drag the women to a 1st container measured 1 x 1 inch. After dragging, i created a duplicate photo by pressing CTRL + J. So that you cant repeat the process once more. Just hit CTRL + J if you will create more duplicates photo. After pressing CTRL + J use Move Tool to drag to a filling area of this container.

Continue Here: ( I created 4 copies from 1 photo to sum it up 5 photos)
Step 8:
I created another 5 still 1 x 1 photo container to another picture. I just drag the vertical and horizontal line to divide it. See this image below.

Step 9:
Same Process with Step 5. CTRL + T to resize the image and then select Marquee Tool to make a square selection from head going to her shoulder. Click and Drag from a top going to her shoulder. Then move to another container using Move Tool. After moving, press CTRL + J to duplicate more copies with this another women.


Another sizes of photo just click this blue link below.
Advertisement
3 comments:
Its great resources for photo resizing, thanks
Its very good and deep resources, thanks a lot for this good idea
I have followed this website, you are always sharing best quality post
Post a Comment